Reeve - User Guide
Reeve - User Guide
Table of Contents
- 1. Introduction
- 2. Quick start
-
3. Features
- 3.1 Understanding the command format
- 3.2 General features
-
3.3 Features for managing student administrative details
- 3.3.1 Adding a student:
add(By: Hogan) - 3.3.2 Listing all students:
list - 3.3.3 Editing a student:
edit(By: Vaishak) - 3.3.4 Locating students:
find(By: Choon Siong) - 3.3.5 Deleting a student:
delete - 3.3.6 Sorting the list of students:
sort(By: Choon Siong) - 3.3.7 Finding students with overdue fees:
overdue(By: Ying Gao) -
3.3.8 Managing details for a student:
detail(By: Vaishak) - 3.3.9 Viewing lesson schedule:
schedule(By: Alex Chua) - 3.3.10 Clearing all entries:
clear
- 3.3.1 Adding a student:
- 3.4 Features for managing student academic details
- 3.5 Notebook feature (By: Choon Siong)
- 4. Command summary
- 5. Glossary
- 6. FAQ
1. Introduction
Welcome to Reeve!
1.1 About Reeve
Are you looking for a one-stop application that can handle all your private tutoring needs? Then you are in luck!
Reeve is a desktop application for private tutors to better manage both administrative and academic details of their students, optimised for use via a Command Line Interface (CLI) for receiving inputs while still having the benefits of a Graphical User Interface (GUI) for displaying information. In addition, Reeve comes with a customisable personal scheduler to assist you in keeping track of your classes. Reeve also allows you to set timely reminders for yourself.
Get to experience all the above without even having to move your mouse at all!
Also, did we mention that you are able to achieve all the above without internet access at all?
If you are a private tutor that wants to not only manage your students’ administrative and academic details with ease but to also better meet their needs, then Reeve is made for you!
Let’s dive into the User Guide to find out more!
1.2 Understanding the User Guide
The goal of this User Guide is to provide you with the information on how to utilise Reeve to its fullest.
For those who are unfamiliar with what a CLI is, no worries! This User Guide will ensure that you will be able to understand how to use a CLI by the end of it.
Here is a summary (Table 1) of the symbols that are used in this User Guide:
Table 1: Summary of symbols
| Symbol | Meaning |
|---|---|
USER_INPUT |
User input into the CLI |
| Important information | |
| Warnings |
2. Quick start
This section serves to explain how to set up Reeve on your computer and how to make sense of the visual layout of the application.
2.1 Setting up Reeve
-
Ensure you have Java 11 or above installed in your Computer.
-
Download the latest .jar file from here.
-
Copy the file to the folder you want to use as the home folder for Reeve.
-
Double-click the file to start the app. The GUI similar to the below figure (Figure 1) should appear in a few seconds. Note how the app contains some sample data.
-
Type the command in the command box and press Enter to execute it. e.g. typing
helpand pressing Enter will open the help window.
Some example commands you can try:-
list: Lists all students. -
addn/Alex p/93211234 s/Commonwealth Secondary School y/Primary 6 v/Blk 33 West Coast Rd #21-214 t/1 1430-1630 f/25 d/12/12/2020: Adds a student namedAlexto Reeve. -
delete3: Deletes the 3rd student shown in the current list. -
clear: Deletes all students. -
exit: Exits Reeve.
-
-
Refer to the Features section below for details of each command.
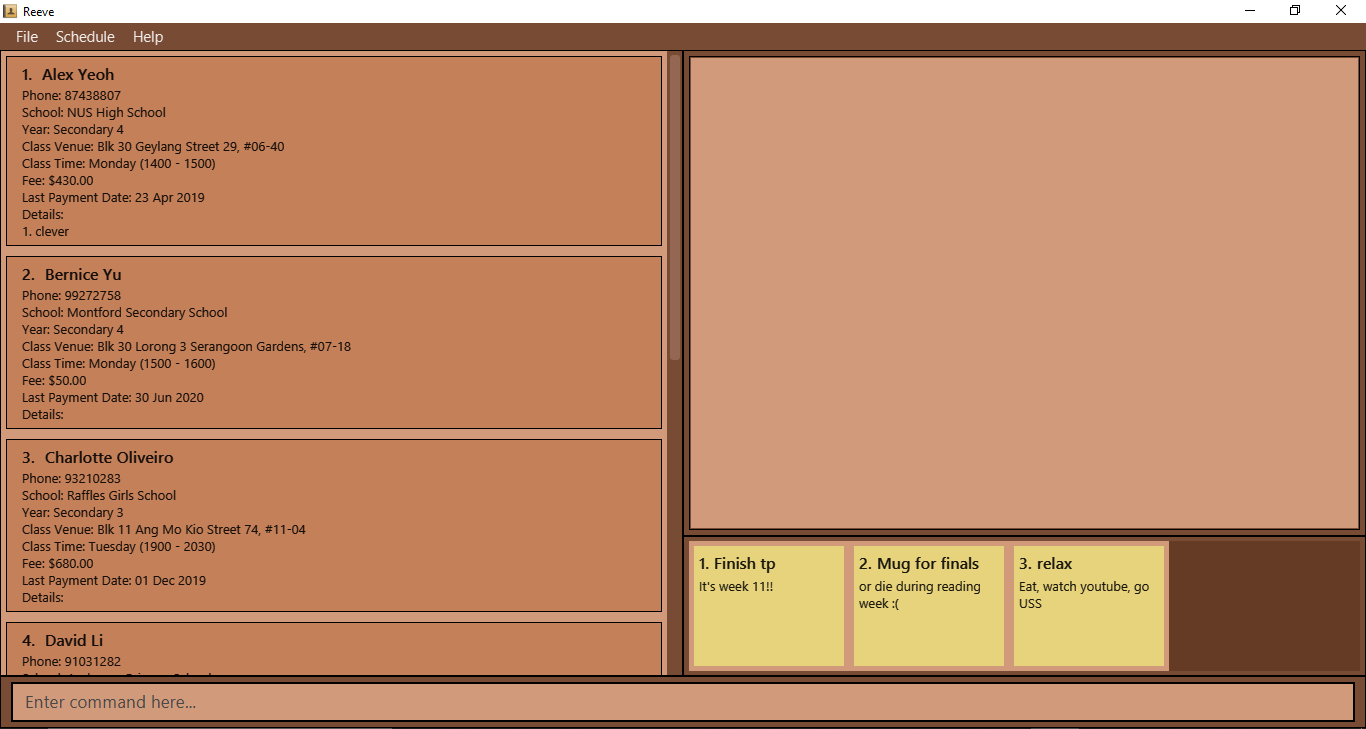
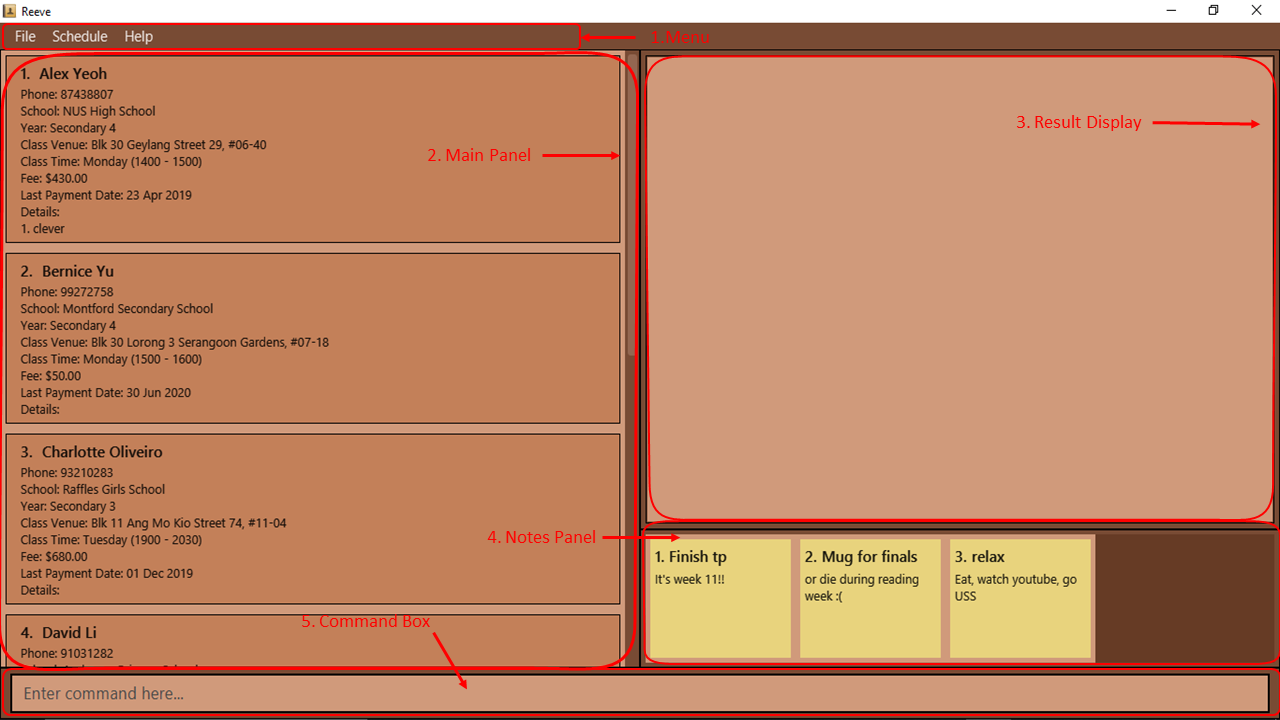
2.2 Making sense of Reeve’s layout (By: Alex Chua)
This section serves to help you understand the layout of Reeve. Please refer to the figure below (Figure 2) for help.
-
Menu
These tabs allows you to simply click on them and get what is needed.
-
Main Panel
The main panel shows your list of students for easy reference. You could also view your schedule in this panel.
-
Result Display
The result display is where Reeve provides responses to your commands.
-
Notes Panel
The notes panel displays all your notes that you have added.
-
Command Box
The command box allows you to type any commands that is accepted in Reeve.
3. Features
This section serves to provide you a detailed explanation of how the various features of Reeve work and how to use these features.
3.1 Understanding the command format
The following points explain how to make sense of the command format:
-
Words in
UPPER_CASEare the parameters to be supplied by the user.
e.g. inadd n/NAME,NAMEis a parameter which can be used asadd n/John Doe. -
Items in square brackets are optional.
e.gn/NAME [a/DETAIL_TEXT]can be used asn/John Doe a/Likes to read booksor asn/John Doe. -
Items with
… after them can be used multiple times including zero times.
e.g.[a/DETAIL_TEXT]…can be used asa/Likes to read books,a/Likes sweets a/Needs help with Algebraetc. -
Parameters can be in any order.
e.g. if the command specifiesn/NAME p/PHONE_NUMBER,p/PHONE_NUMBER n/NAMEis also acceptable.
3.2 General features
This section serves to provide you a detailed explanation of the general features which will help you to maximise the potential of Reeve.
3.2.1 Viewing help: help
If you are unsure of any of the commands, this command will direct you to the help page.
Format: help
Expected outcome:
The following figure (Figure 3) shows the help window entering the command help.

3.2.2 Toggling between academic and administrative details: toggle (By: Hogan)
Since each student contains some administrative and academic details, this command allows you to toggle between viewing these details to allow you to focus on the type of details that you are currently interested in. By default, the administrative details of students are shown upon starting the application.
Format: toggle
Example:
- By default, you should see the administrative details of your students.
- If you have not entered the
togglecommand, you should see a screen similar to the one below (Figure 4).
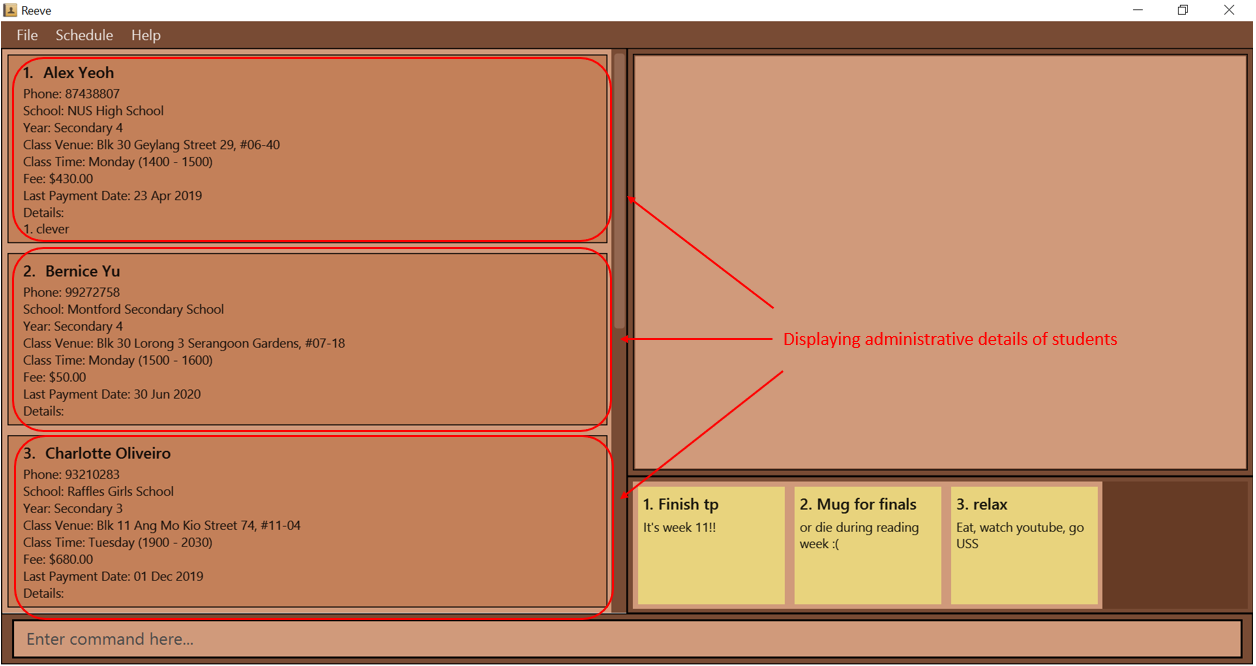 Figure 4: Before entering toggle command
- After entering the
togglecommand, you will switch to displaying academic details of students as shown below (Figure 5).
 Figure 5: After entering toggle command
 - If you have not entered the
3.2.3 Exiting the program: exit
You can exit the program with the exit command. Any changes you have made to Reeve is automatically saved to your drive, so do not have to worry about losing data.
Format: exit
3.3 Features for managing student administrative details
Reeve’s student administrative features allows you to keep track of key administrative details of each of your students such as phone number, class venue, tuition fee, etc. Thereafter, you will be able to view, edit find or delete these students.
3.3.1 Adding a student: add (By: Hogan)
You can add a student together with his/her administrative details into Reeve’s student list.
Format: add n/NAME p/PHONE s/SCHOOL y/YEAR v/CLASS_VENUE t/CLASS_TIME [f/FEE] [d/LAST_PAYMENT_DATE] [a/ADDITIONAL_DETAILS]…
- The format of
YEARis as follows:-
TYPE_OF_SCHOOL LEVEL(e.g. y/primary 2 and y/p 2 are the same and both acceptable). -
TYPE_OF_SCHOOLaccepts Primary (Pri/P), Secondary (Sec/S) or JC (J), and is case-insensitive. -
LEVELhas to be valid for theTYPE_OF_SCHOOL(i.e. Primary 1 - Primary 6, Secondary 1 - Secondary 5, JC 1 - JC 2)
-
- The format of
CLASS_TIMEis as follows:DAY_OF_WEEK START_TIME-END_TIME-
DAY_OF_WEEKis any integer from 1 to 7, where 1 refers to Monday while 7 refers to Sunday. -
START_TIMEandEND_TIMEfollows the 24-hr clock format (e.g. 1300 refers to 1pm).
- The format of
LAST_PAYMENT_DATEisdd/mm/yy or dd/mm/yyyy(e.g. both 3/2/20 and 3/2/2020 are acceptable). -
FEEdefaults to $0.00 if not included. -
LAST_PAYMENT_DATEdefaults to today’s date if not included.
![]() You cannot add duplicates of a student. Each student is uniquely identified by his/her
You cannot add duplicates of a student. Each student is uniquely identified by his/her NAME, PHONE, SCHOOL and YEAR.
![]()
LAST_PAYMENT_DATE cannot be a future date (i.e. cannot be later than the current date)
![]() The specified
The specified END_TIME for the CLASS_TIME field should not be before the START_TIME (e.g. 1300-1200 is invalid).
Examples:
- Suppose you want to add a student without any additional details.
- You can use something like
add n/Brendan Tan p/93211234 s/Commonwealth Secondary School y/pri 6 v/Blk 33 West Coast Rd #21-214 t/5 1430-1630 f/25 d/10/10/2020. - You should see a screen similar to the one shown below (Figure 6).
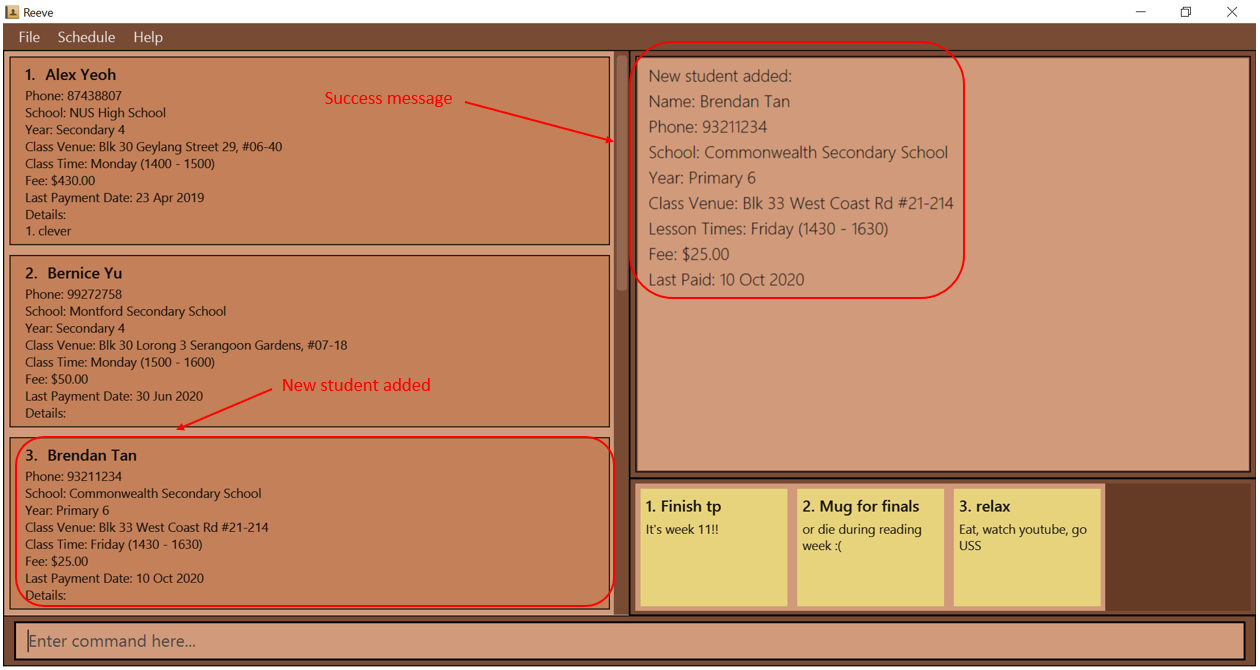 Figure 6: After entering add command
 - You can use something like
- Also, if you want to add a student with multiple additional details.
- You can use something like
add n/John Doe p/98765432 s/Woodlands Secondary School y/s 2 v/347 Woodlands Ave 3, Singapore 730347 t/1 1200-1400 f/30 d/24/09/2020 a/Likes chocolates a/Needs help with Algebra
- You can use something like
3.3.2 Listing all students: list
You can view the list of all students in Reeve sorted by name.
Format: list
![]() You will need to use this if you wish to view the full student list after using commands such as
You will need to use this if you wish to view the full student list after using commands such as find, overdue and schedule.
3.3.3 Editing a student: edit (By: Vaishak)
You can edit an existing student in Reeve if you need to update his/her particulars.
Format: edit STUDENT_INDEX [n/NAME] [p/PHONE] [s/SCHOOL] [y/YEAR] [v/CLASS_VENUE] [t/CLASS_TIME] [f/FEE] [d/LAST_PAYMENT_DATE]
- Edits the student at the specified
STUDENT_INDEX. TheSTUDENT_INDEXrefers to the index number shown in the displayed student list. TheSTUDENT_INDEXmust be a positive integer 1, 2, 3, … - At least one of the optional fields must be provided.
- Existing values will be updated to the input values.
- The format of
CLASS_TIME,YEARandLAST_PAYMENT_DATEfollows that as stated in the add command section.
![]() If using this command after
If using this command after find, the edited student may no longer satisfy the search criteria depending on the field changed.
In that case the student will be hidden from view and can be viewed again using list or find.
E.g. edit 1 n/Amy Choo after find n/Bob will cause the student to be hidden since her name no longer contains “Bob”.
You can use list or find (e.g find n/Amy) to display her information again.
![]() You cannot add / edit additional details with this command.
You cannot add / edit additional details with this command.
Examples:
-
edit 1 n/Arthur p/98727030 s/Meridian Junior Collegeedits the name, phone number and school of the 1st student to beArthur,98727030andMeridian Junior Collegerespectively.
Expected outcome: The following figure (Figure 7) shows the expected outcome after executing the above example.

3.3.4 Locating students: find (By: Choon Siong)
You can search for students who satisfy the given search criteria.
Format: find [n/NAME] [s/SCHOOL] [y/YEAR]
- The search is case-insensitive. e.g
hanswill matchHans - At least one of the optional fields must be provided.
- The order of the optional fields do not matter. e.g
n/Hans s/River Valleyis the same ass/River Valley n/Hans - For the name criteria, only students with a name that contains any full keyword specified will be matched.
- For the school criteria, only students with a school that contains all keywords specified will be matched.
- For the year criteria, only students with the same year will be matched. (See below for more elaboration for format of year)
- Only students matching all criteria specified will be returned (i.e
ANDsearch).
Examples:
-
find n/Alex davidmatchesAlex David,alex davidandAlex david. -
find n/Alex daviddoes not matchAlexis Davinder. -
find s/yishun secmatchesYishun Secondary School,Yishun Town Secondary SchoolandYishun Sec. -
find s/yishun secondarymatchesYishun Secondary SchoolandYishun Town Secondary Schoolbut notYishun Sec. -
find n/alex s/yishun y/sec 3searches for all students who match all ofn/alex,s/yishunandy/sec 3.
3.3.5 Deleting a student: delete
You can delete a specified student from Reeve to allow you to get rid of any unwanted student data.
Format: delete STUDENT_INDEX
- Deletes the student at the specified
STUDENT_INDEX. -
STUDENT_INDEXrefers to the index number shown in the displayed students list.
![]()
STUDENT_INDEX must be a positive integer 1, 2, 3, …
Examples:
-
listfollowed bydelete 2deletes the 2nd student in Reeve. -
find n/Betsyfollowed bydelete 1deletes the 1st student in the results of thefindcommand.
3.3.6 Sorting the list of students: sort (By: Choon Siong)
You can sort your student list by a specified means of comparison. The means of comparison must be the student’s name, class time or year. This is useful in situations where you want to look at your student list differently for various reasons.
Format: sort COMPARISON_MEANS
- The valid options for
COMPARISON_MEANSarename,classTimeoryear. - Only one option for the means of comparison can be specified.
- The means of comparison is case-sensitive when being specified
- means of comparison:
-
name: Sorts students by their name in case-insensitive alphabetical order. This is useful when you want to search through your student list easily. -
classTime: Sorts students by the day of their class followed by its time. This is useful when you want to look at your student list in order of upcoming classes. -
yearSorts students by their year withPrimary 1coming first andJC 2last. This is useful when you want to group students by their year.
-
Examples:
-
sort nameto sort students by their name in alphabetical order
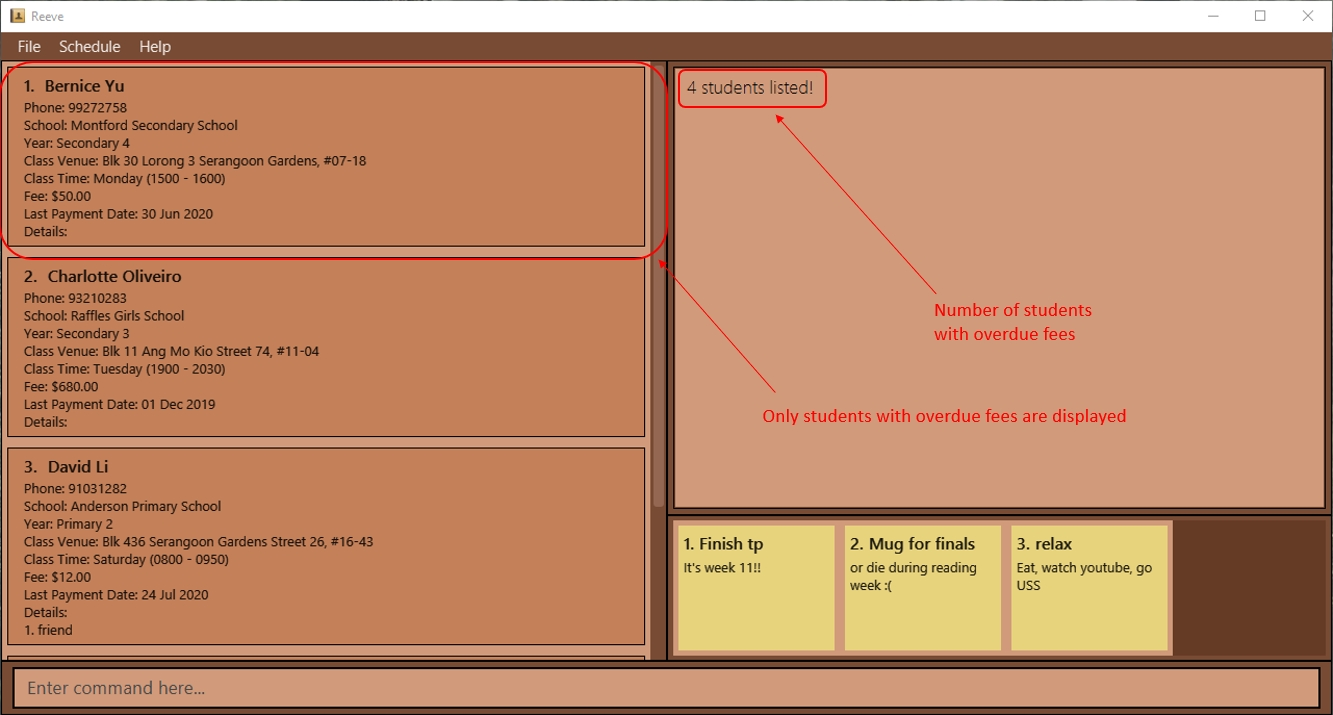
3.3.7 Finding students with overdue fees: overdue (By: Ying Gao)
You can find all students whose date of last payment is more than a month ago.
Format: overdue
- Students tutored for free (i.e.
FEE= $0.00) will not be displayed. - If all students have paid their fees within the past month, no students will be displayed.
![]() If you use
If you use edit to update a student’s last payment date to within a month from now, the student will be hidden from the list as his payment is no longer outstanding.
You can always view his particulars again using list or find. The same also applies if you edit his fee to $0.00.
Expected outcome:
The following figure (Figure 8) shows the expected result after entering the command overdue.
3.3.8 Managing details for a student: detail (By: Vaishak)
You can add, edit or delete a detail for a specified student.
General Format: detail COMMAND_WORD STUDENT_INDEX PARAMETERS
- The
COMMAND_WORDfield accepts eitheradd,editordelete. - The command affects the student at the specified
STUDENT_INDEX. - The format of
PARAMETERSvaries with eachCOMMAND_WORDas explained below.
![]()
STUDENT_INDEX must be a positive integer 1, 2, 3, …
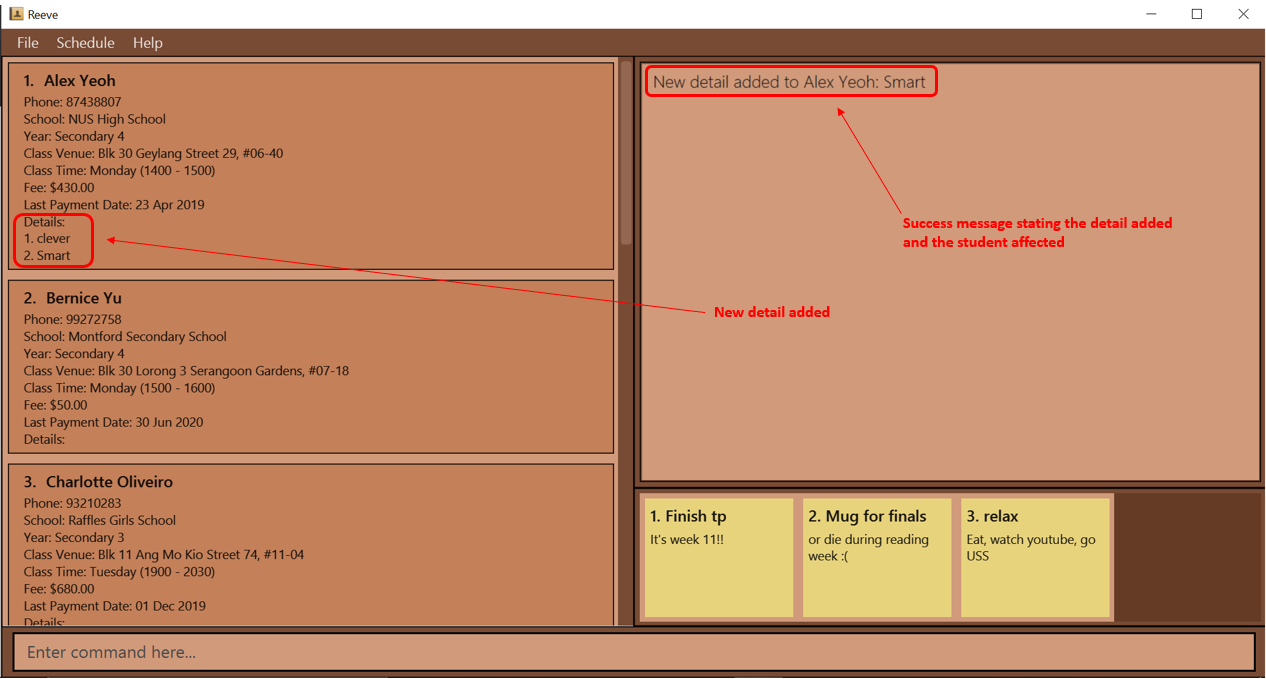
3.3.8.1 Adding a detail: detail add
You can add a detail to a specified student in Reeve.
Format: detail add STUDENT_INDEX t/DETAIL_TEXT
- Adds the detail to the student at the specified
STUDENT_INDEX.
Examples:
-
detail add 1 t/Smartadds the “Smart” detail to the 1st student in Reeve.
Expected outcome: The following figure (Figure 9) shows the expected outcome after executing the above example.
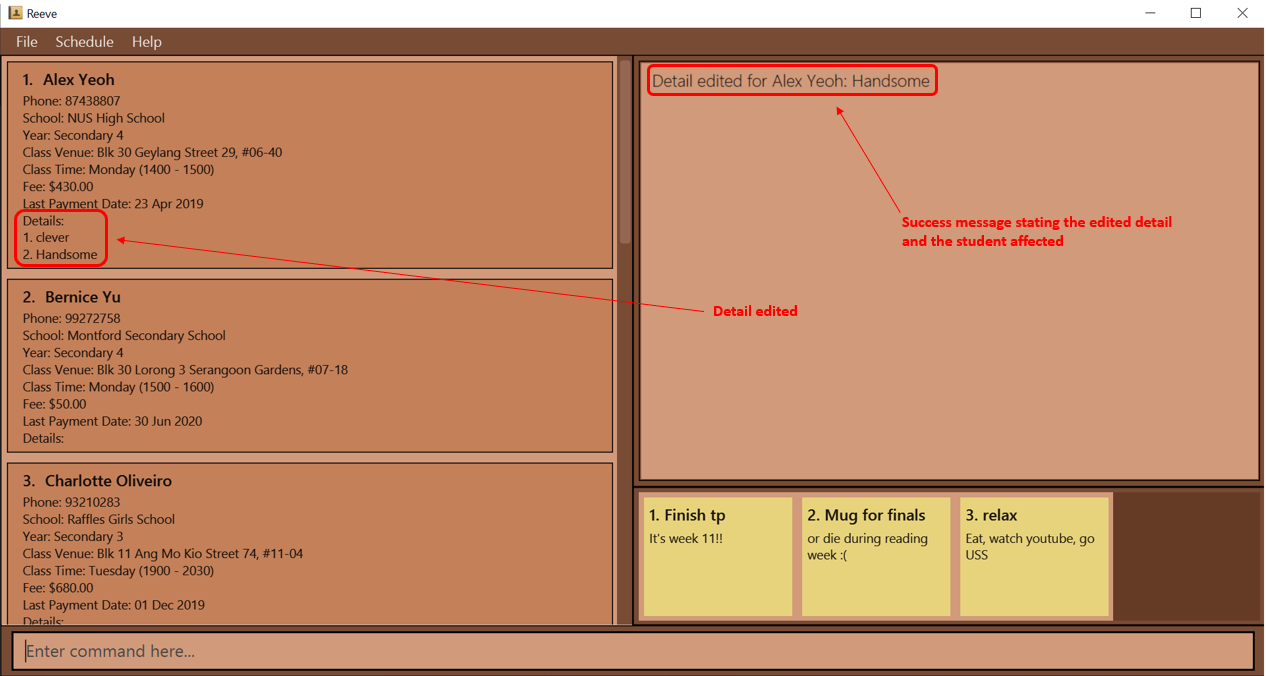
3.3.8.2 Editing a detail: detail edit
You can edit an existing detail for a specified student in Reeve.
Format: detail edit STUDENT_INDEX i/DETAIL_INDEX t/DETAIL_TEXT
- Edits the detail at the specified
DETAIL_INDEXfor the student at the specifiedSTUDENT_INDEX. -
DETAIL_INDEXrefers to the index of the detail to edit, within the detail field of the student. - There has to be a valid detail at the
DETAIL_INDEXprovided.
Examples:
-
detail edit 1 i/2 t/Handsomeedits the 2nd detail for the 1st student in Reeve, to “Handsome”.
Expected outcome: The following figure (Figure 10) shows the expected outcome after executing the above example.
3.3.8.3 Deleting a detail: detail delete
You can delete an existing detail to a specified student in Reeve.
Format: detail delete STUDENT_INDEX i/DETAIL_INDEX
- Deletes the detail at the specified
DETAIL_INDEXfor the student at the specifiedSTUDENT_INDEX. -
DETAIL_INDEXrefers to the index of the detail to delete, within the detail field of the student. - There has to be a valid detail at the
DETAIL_INDEXprovided.
Examples:
-
detail delete 1 i/1deletes the 1st detail for the 1st student in Reeve.
Expected outcome: The following figure (Figure 11) shows the expected outcome after executing the above example.

3.3.9 Viewing lesson schedule: schedule (By: Alex Chua)
You can view your classes on a timetable in either a daily or weekly format.
Format: schedule m/VIEW_MODE d/DATE_TO_VIEW
- Displays a timetable view of your classes with the corresponding student’s name tagged to it.
-
DATE_TO_VIEWrefers to the date you wish to view the lesson schedule of. - The format of
DATE_TO_VIEWisdd/mm/yy or dd/mm/yyyy(e.g. both 3/2/20 and 3/2/2020 are acceptable). -
VIEW_MODErefers to the mode where you would like the schedule to be rendered on screen. It accepts eitherweeklyordailyas inputs and is case-insensitive.
Example:
Suppose you have multiple classes in the coming week of 2nd November 2020 and you want to plan for them ahead.
Instead of scrolling through your student details to find out who you have classes with,
you can simply type schedule m/weekly d/02/11/2020 to view them in a visual interface.
To view schedule:
-
Type
schedule m/weekly d/02/11/2020into the command box as shown in Figure 12 . PressEnterto execute the command.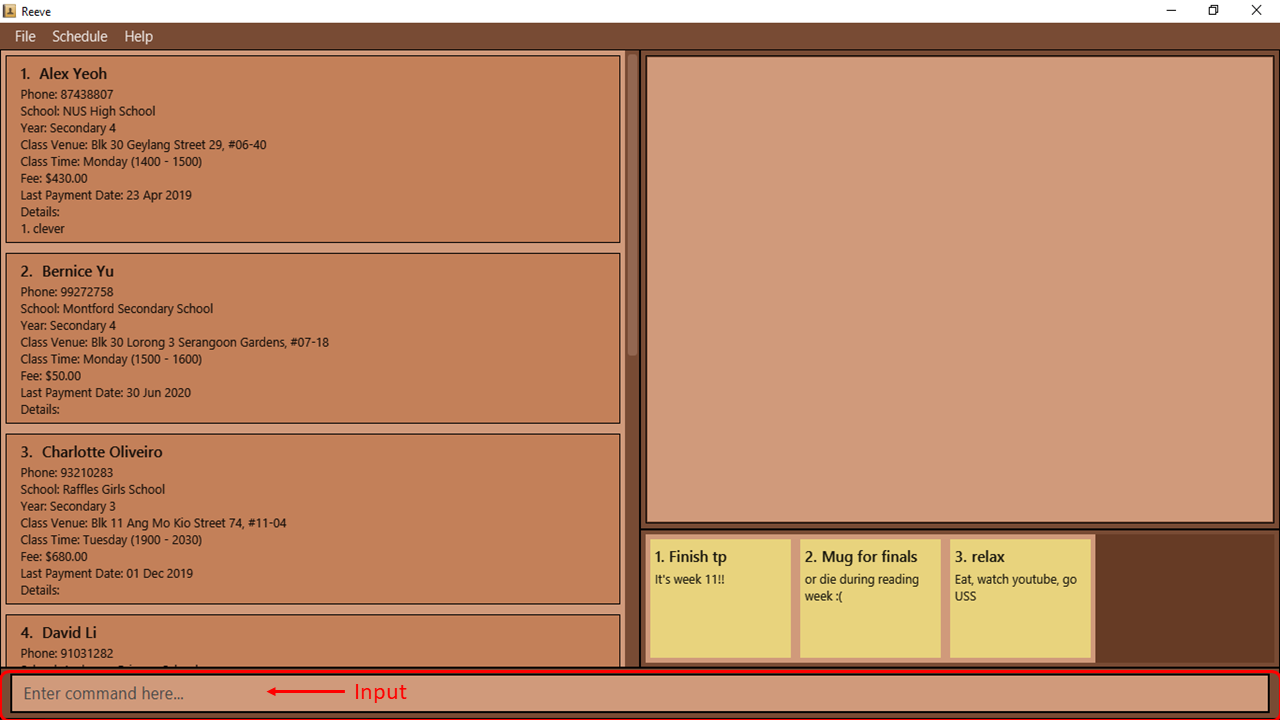 Figure 12: Shows the schedule command input keyed into the command box
 -
The schedule panel, as labelled in Figure 13, will appear with all your classes for the week of 2nd November 2020 populated.
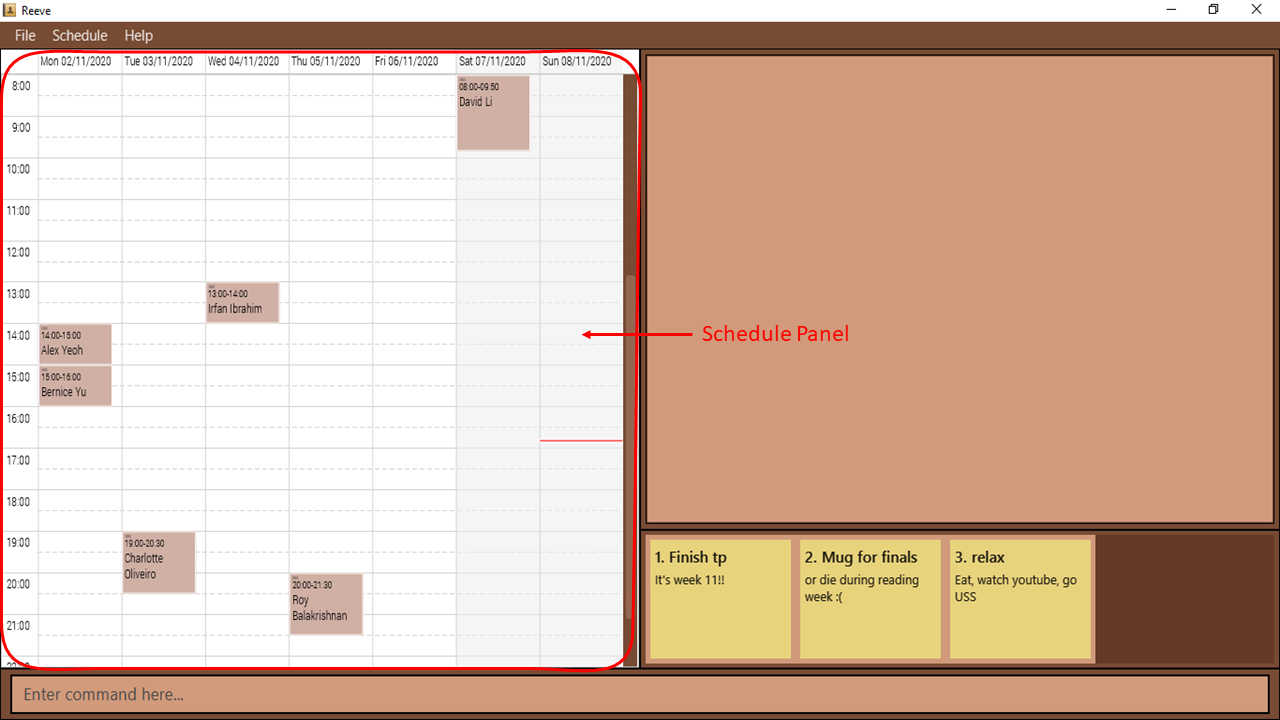 Figure 13: Shows the schedule panel in the weekly format
 -
You can easily view your classes for the week. The Date bar labelled in Figure 14 below shows the day of the week as well as the date for your reference. The Time bar in Figure 14 shows the time in 24-hour clock format with 1-hour intervals. The Classes labelled in Figure 14 are colored brown to match the color of Reeve for a better visual experience. Furthermore, the name of the student that you are tutoring during that slot will be labelled for you to identify classes easily. The red bar in Figure 14 indicates your current time. With the date, time and name of student shown in one view, you could plan your classes without a hassle.
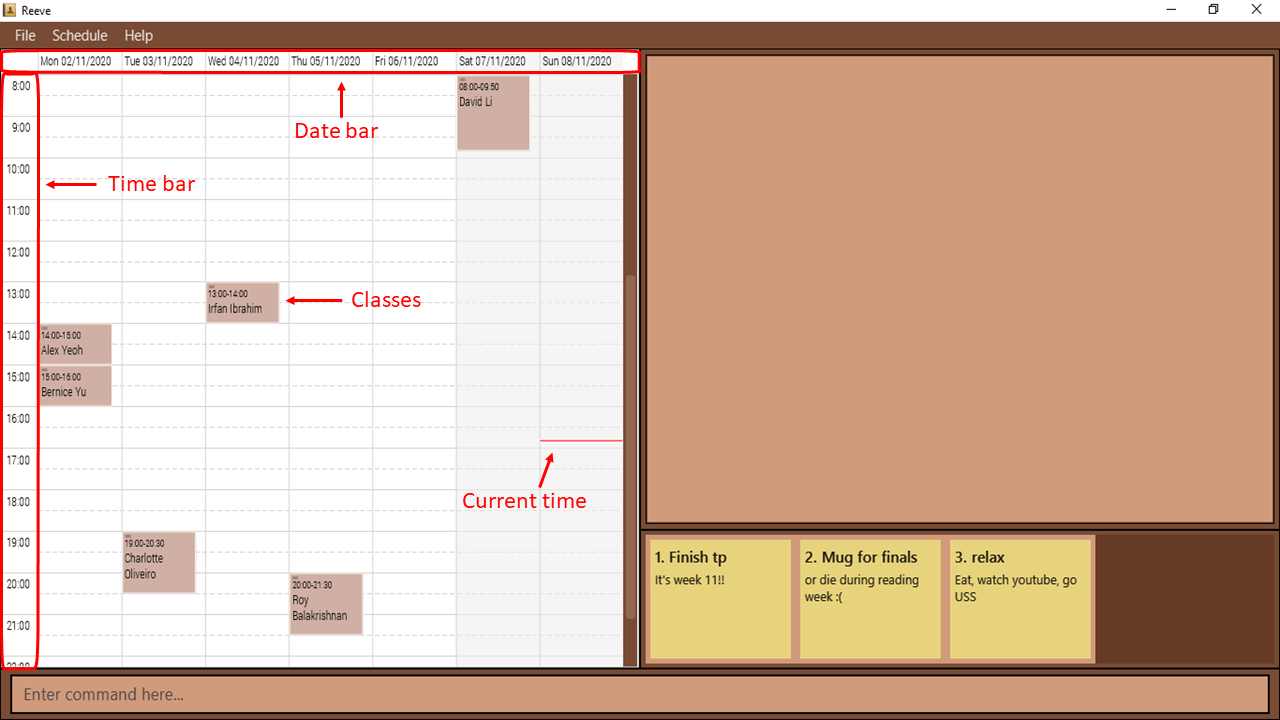 Figure 14: Shows various component of your schedule
![]() You could also click on the Schedule tab in the Menu to open or close the schedule.
Viewing it this way would open up your schedule of the current week in the weekly format.
You could use this as quick way to open up schedule for the current week.
You could also click on the Schedule tab in the Menu to open or close the schedule.
Viewing it this way would open up your schedule of the current week in the weekly format.
You could use this as quick way to open up schedule for the current week.
![]() A class duration of less than an hour may not be shown fully on the schedule.
A class duration of less than an hour may not be shown fully on the schedule.
3.3.10 Clearing all entries: clear
If you ever need to clear all existing data in Reeve, you can do so using this command.
Format: clear
3.4 Features for Managing Student Academic Details
Reeve’s student academics features allows you to keep track of key academic details of each of your students such as questions, exams and etc. Thereafter, you will be able to view, edit or delete these details of each student.
3.4.1 Recording questions from a student: question (By: Ying Gao)
You can add, resolve or remove questions to/from a specified student in Reeve.
General Format: question COMMAND_WORD STUDENT_INDEX DETAILS
- The
COMMAND_WORDfield accepts eitheradd,solveordelete. - The command affects the student at the specified
STUDENT_INDEX, which is his/her position on the list. - The format of
DETAILSvaries with each command word as explained below.
![]()
STUDENT_INDEX must be a positive integer 1, 2, 3, …
3.4.1.1 Adding a question: question add
If a student asks you a difficult question, you can record it in Reeve and find the answer to it after the lesson.
Format: question add STUDENT_INDEX t/QUESTION_TEXT
- This records a new unresolved question to the student at the specified
STUDENT_INDEX. - The
QUESTION_TEXTfield refers to the question the student raised, and can be a full sentence.
![]()
QUESTION_TEXT must not be empty.
Example:
-
question add 1 t/How do birds fly?records “How do birds fly?” as a question from the 1st student in Reeve.
Expected outcome:
The following figure (Figure 15) shows the result of recording “How do I pass CS2101?” as a new question from Bernice Yu.

3.4.1.2 Resolving a question: question solve
After finding the solution to the question, you can mark the student’s question as resolved.
Format: question solve STUDENT_INDEX i/QUESTION_INDEX t/SOLUTION_TEXT
- This resolves the question from the student at the specified
STUDENT_INDEX - This resolves the question at the
QUESTION_INDEX. TheQUESTION_INDEXrefers to the position of the question in the student’s list of questions.
![]()
QUESTION_INDEX must be a positive integer 1, 2, 3, …
![]()
SOLUTION_TEXT must not be empty.
![]() You can only resolve unanswered questions (i.e. questions with a cross symbol next to it).
You can only resolve unanswered questions (i.e. questions with a cross symbol next to it).
Example:
-
question solve 1 i/1 t/Read a book.marks the 1st question of the 1st student in Reeve as answered.
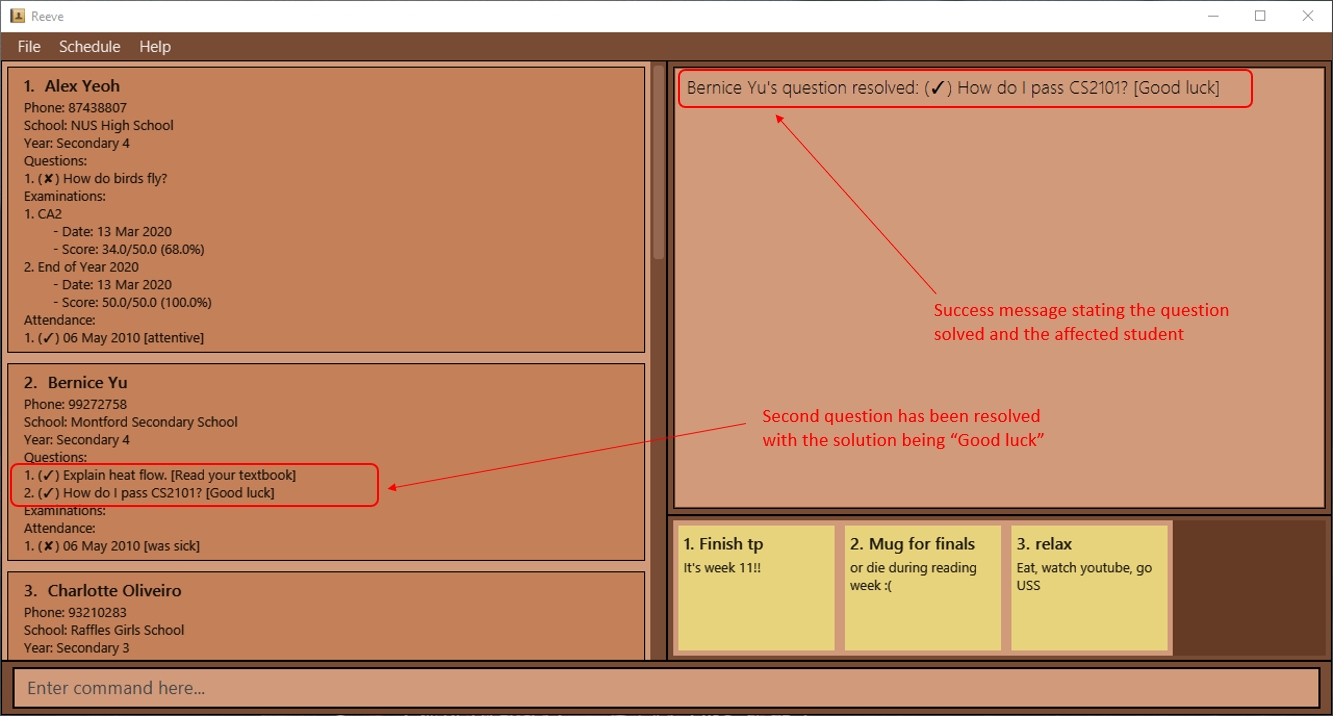
Expected outcome:
The following figure (Figure 16) shows the result of resolving Bernice’s second question.
3.4.1.3 Deleting a question: question delete
If you do not need a student’s question anymore, you can delete it.
Format: question delete STUDENT_INDEX i/QUESTION_INDEX
- This deletes the question at the specified
QUESTION_INDEX.
![]()
QUESTION_INDEX must be a positive integer 1, 2, 3, …
Example:
-
question delete 1 i/1deletes the 1st question of the 1st student in Reeve.
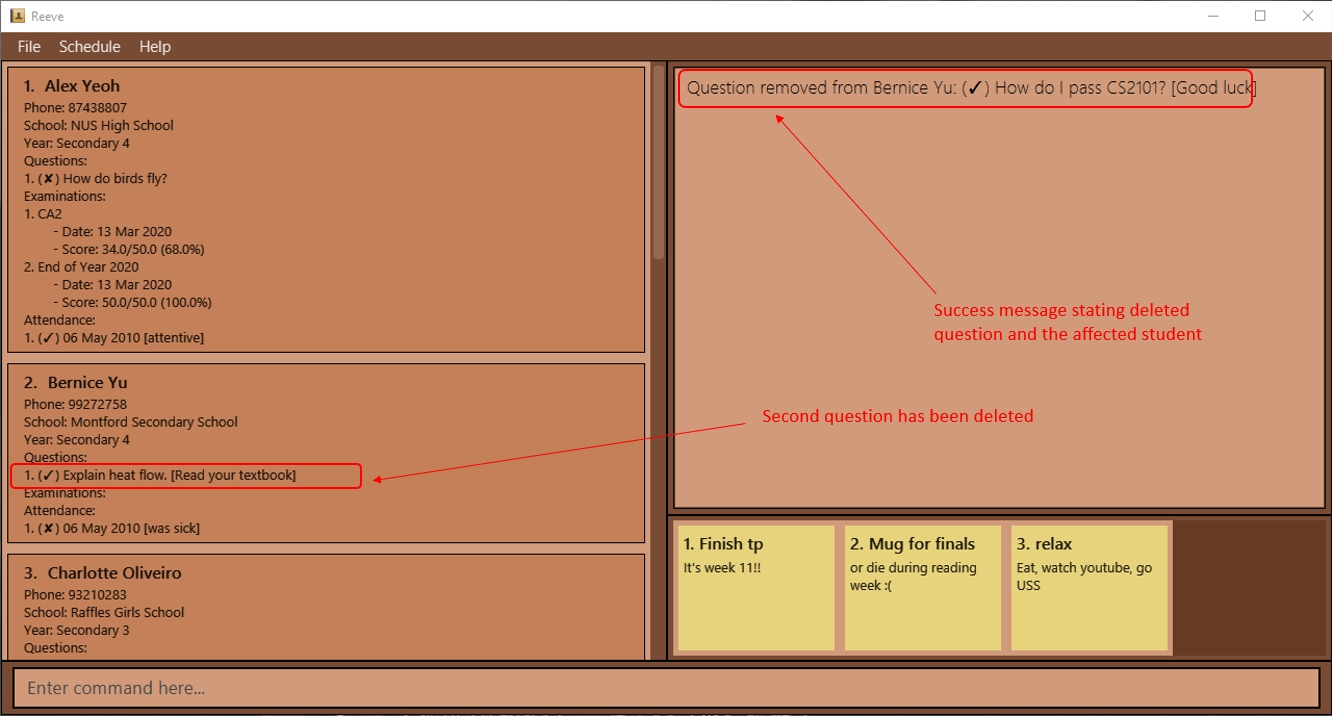
Expected outcome:
The following figure (Figure 17) shows the result of deleting Bernice’s second question.
3.4.2 Recording exams of a student: exam (By: Hogan)
You can add or delete an exam record to/from a specified student. You can then view the exam statistics of a student in the form of a score percentage to exam date line graph. This helps you to keep track of your students academic progress allowing you to take note of those who are not doing too well.
General Format: exam COMMAND_WORD_EXAM STUDENT_INDEX PARAMETERS
- The
COMMAND_WORD_EXAMfield accepts eitheradd,deleteorstats. - The command can affect the student at the specified
STUDENT_INDEX. -
STUDENT_INDEXrefers to the index number shown in the displayed students list. - The format of
PARAMETERSvaries with each command word as explained in the following subsections.
![]()
STUDENT_INDEX must be a positive integer 1, 2, 3, …
3.4.2.1 Adding an exam record to a student: exam add
You can add an exam record to a specified student in Reeve to keep track of your students’ academic progress.
Format: exam add STUDENT_INDEX n/EXAM_NAME d/EXAM_DATE s/EXAM_SCORE
- Adds the given exam record to the student at the specified
STUDENT_INDEX. - The format of
EXAM_DATEisdd/mm/yy or dd/mm/yyyy(e.g. both 3/2/20 and 3/2/2020 are acceptable). - The format of
EXAM_SCOREis as follows:-
MARKS/TOTAL_SCOREwhereMARKSandTOTAL_SCOREare non-negative numbers. -
MARKShas to be less than or equal toTOTAL_SCORE(e.g. 30/50).
-
![]() Scores and score percentages will be rounded off to two decimal places.
Scores and score percentages will be rounded off to two decimal places.
![]() You cannot add duplicates of an exam record to a student. Each exam record is uniquely identified by its
You cannot add duplicates of an exam record to a student. Each exam record is uniquely identified by its EXAM_NAME.
Example:
- Suppose you want to add an exam record to a student to monitor his academic progress.
- You can use
exam add 1 n/Mid Year 2020 d/08/12/2020 s/40/60to add a new exam record to the first student in the displayed student list on the main panel with exam nameMid Year 2020, exam date08/12/2020and score40/60so that you can keep track of this particular exam record. - You should see a screen similar to the one below (Figure 18) after entering the above command.
 Figure 18: After entering add exam command
 - You can use
3.4.2.2 Deleting an exam record for a student: exam delete
You can delete a specific exam record from a specified student in Reeve to remove any unwanted exam record data.
Format: exam delete STUDENT_INDEX i/EXAM_INDEX
- Deletes the exam at
EXAM_INDEXin the specified student’s exam records list. - The specified exam record is chosen based on
EXAM_INDEX. - The
EXAM_INDEXrefers to the index number shown in the displayed student’s exam records list.
![]()
EXAM_INDEX must be a positive integer 1, 2, 3, …
Example:
- Suppose you have an outdated exam record or an exam record with wrong details such as the exam date or score and you wish to remove this exam record.
- For instance, if your current list looks similar to the figure below (Figure 19).
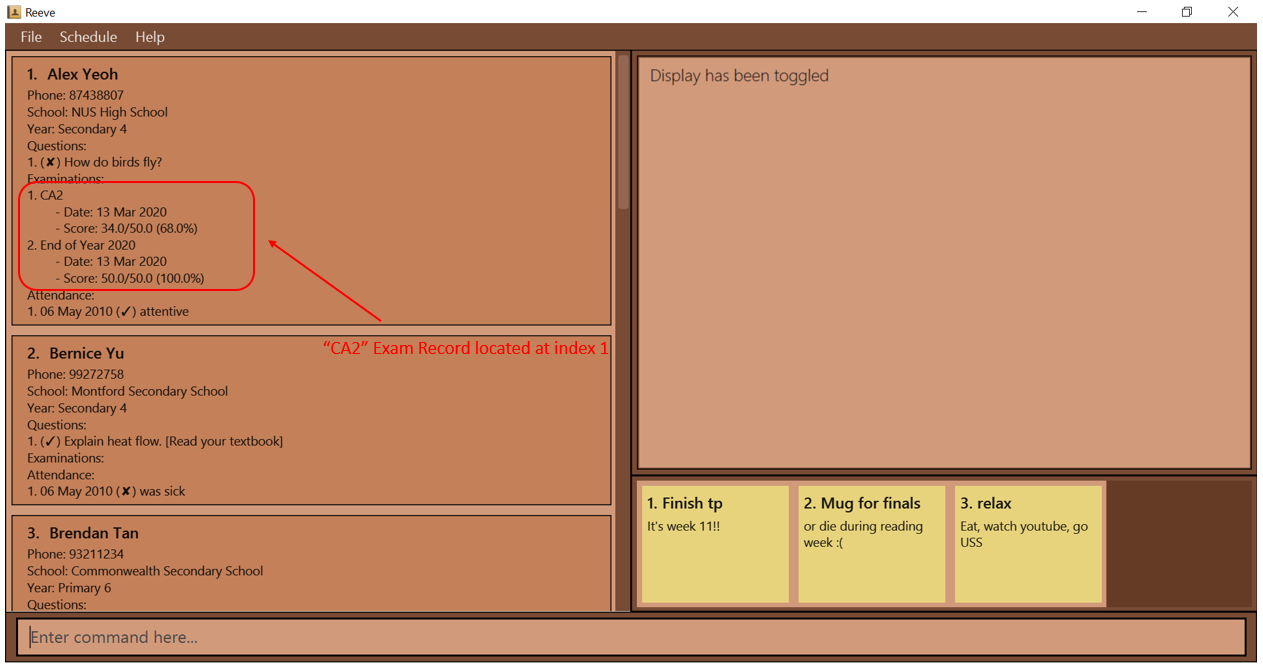 Figure 19: Before entering delete exam command
- You can use
exam delete 1 i/1to delete the first exam record of the first student in the displayed student list on the main panel. - You should see that you have successfully deleted the first exam record of the first student as shown below (Figure 20) after entering the above command.
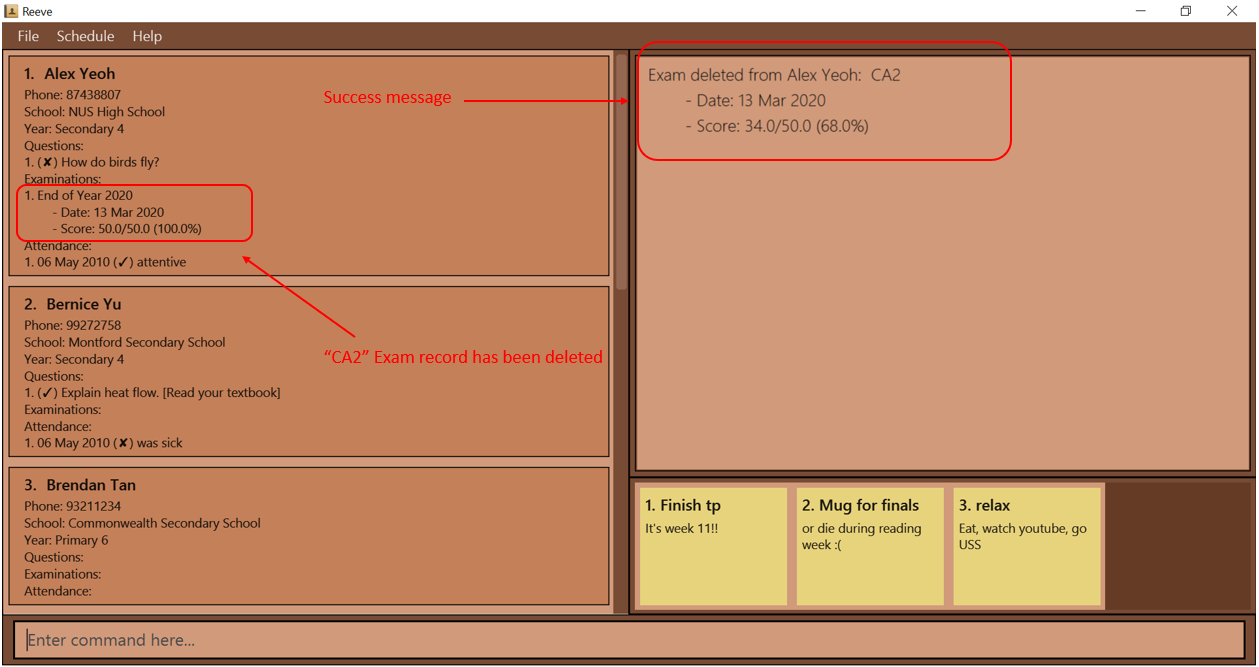 Figure 20: After entering delete exam command
3.4.2.3 Viewing exam statistics of a student: exam stats
To gauge how any of your students are doing with their examinations, this command allows you to view a graphical representation of all recorded examinations of a student in the form of a exam score percentage to exam date line graph.
Format: exam stats STUDENT_INDEX
- Views exam statistics of the student at the specified
INDEX.
![]() Exam records are arranged in order of increasing date.
Exam records are arranged in order of increasing date.
Examples:
- Suppose you are trying to view the exam statistics of a particular student to view his academic progress so far in terms of his exam scores.
- You can use
exam stats 1to view the exam statistics of the first student in the displayed student list on the main panel. - You should see a screen similar to the one below (Figure 21) when the above command is entered.
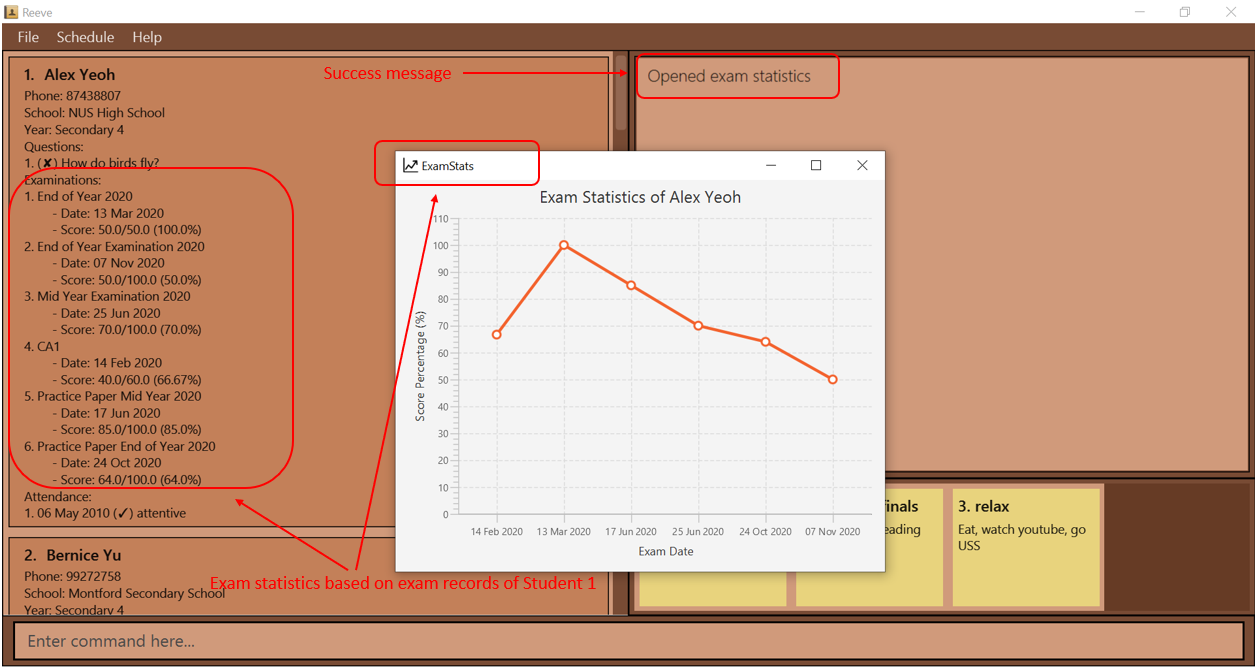 Figure 21: Before entering exam stats command
 - You can use
![]() If you are editing the exams of a student, you will have to enter the
If you are editing the exams of a student, you will have to enter the exam stats command again to get the updated statistics.
3.4.3 Recording attendance of a student: attendance (By: Vaishak)
You can add or delete an attendance record to/from a specified student.
General Format: attendance COMMAND_WORD STUDENT_INDEX PARAMETERS
- The
COMMAND_WORDfield accepts eitheraddordelete. - The command affects the student at the specified
STUDENT_INDEX. -
STUDENT_INDEXmust be a positive integer 1, 2, 3, … - The format of
PARAMETERSvaries with each command word as explained below.
3.4.3.1 Adding an attendance record to a student: attendance add
You can add an attendance record to a specified student in Reeve.
Format: attendance add STUDENT_INDEX d/LESSON_DATE a/ATTENDANCE_STATUS [f/FEEDBACK]
- Adds the given attendance record to the student at the specified
STUDENT_INDEX. - There can only be one attendance record for every
LESSON_DATE. - The format of
LESSON_DATEisdd/mm/yy or dd/mm/yyyy(e.g. both 3/2/20 and 3/2/2020 are acceptable). -
ATTENDANCE_STATUScan only be either “present” or “absent”.
Examples:
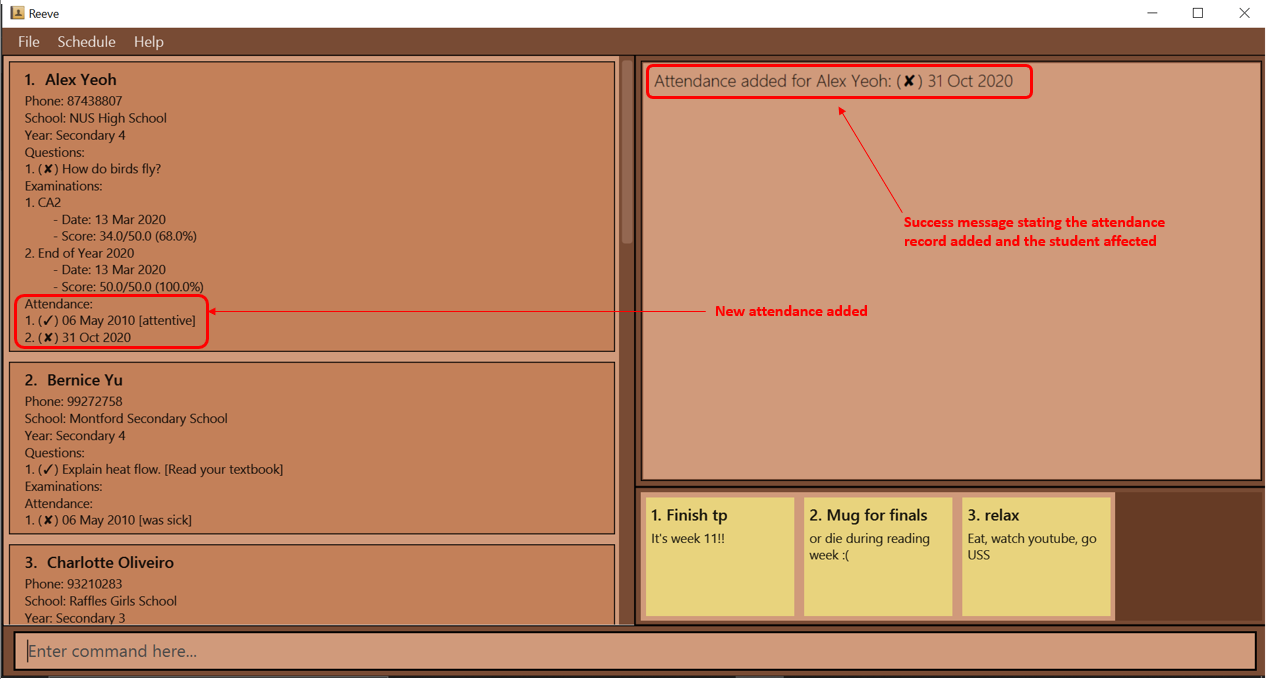
-
attendance add 1 d/31/10/2020 a/absentadds to the 1st student in Reeve a new attendance record for a lesson on 31 Oct 2020, where he was absent, and the tutor has no feedback for him.
Expected outcome: The following figure (Figure 22) shows the expected outcome after executing the above example.
3.4.3.2 Deleting an attendance record for a student: attendance delete
You can delete a specific attendance record from a specified student in Reeve.
Format: attendance delete STUDENT_INDEX d/ATTENDANCE_DATE
- Deletes the attendance record with the given
ATTENDANCE_DATEin the specified student. - The specified student is chosen based on
STUDENT_INDEXof Reeve.
Example:
-
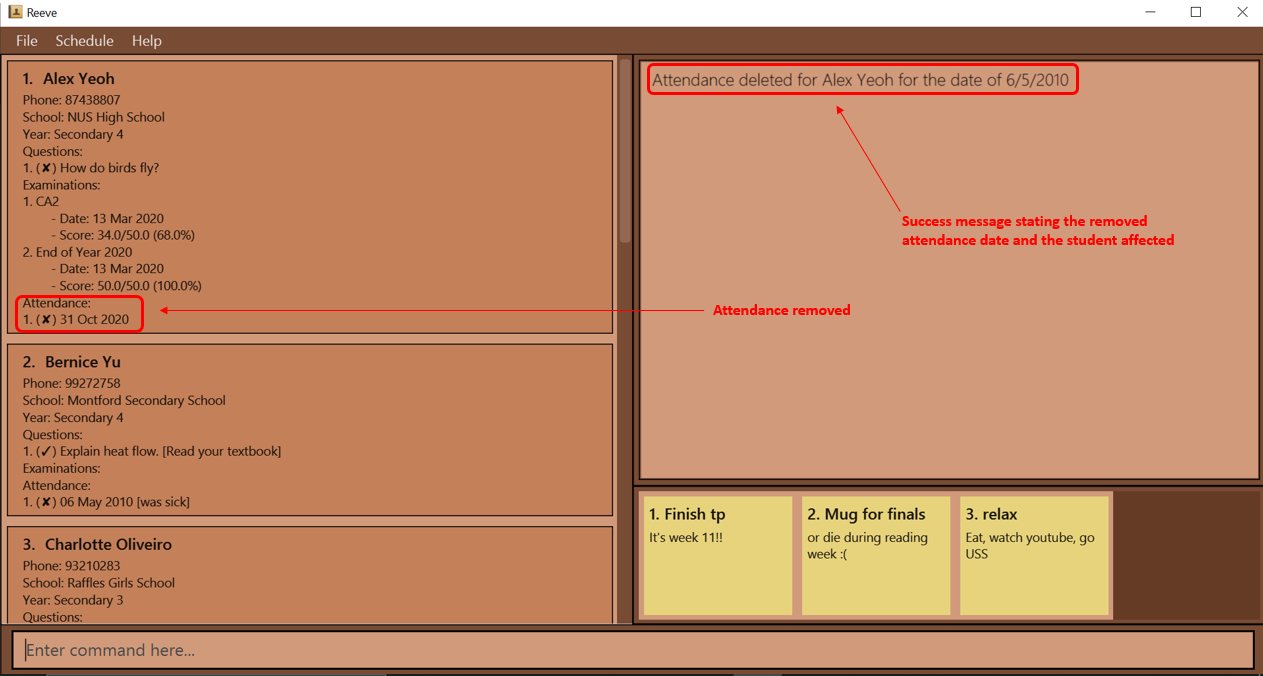
attendance delete 1 d/06/05/2010deletes the attendance with the date 6 Apr 2020 from the 1st student in the displayed students list in Reeve.
Expected outcome: The following figure (Figure 23) shows the expected outcome after executing the above example.
3.5 Notebook feature (By: Choon Siong)
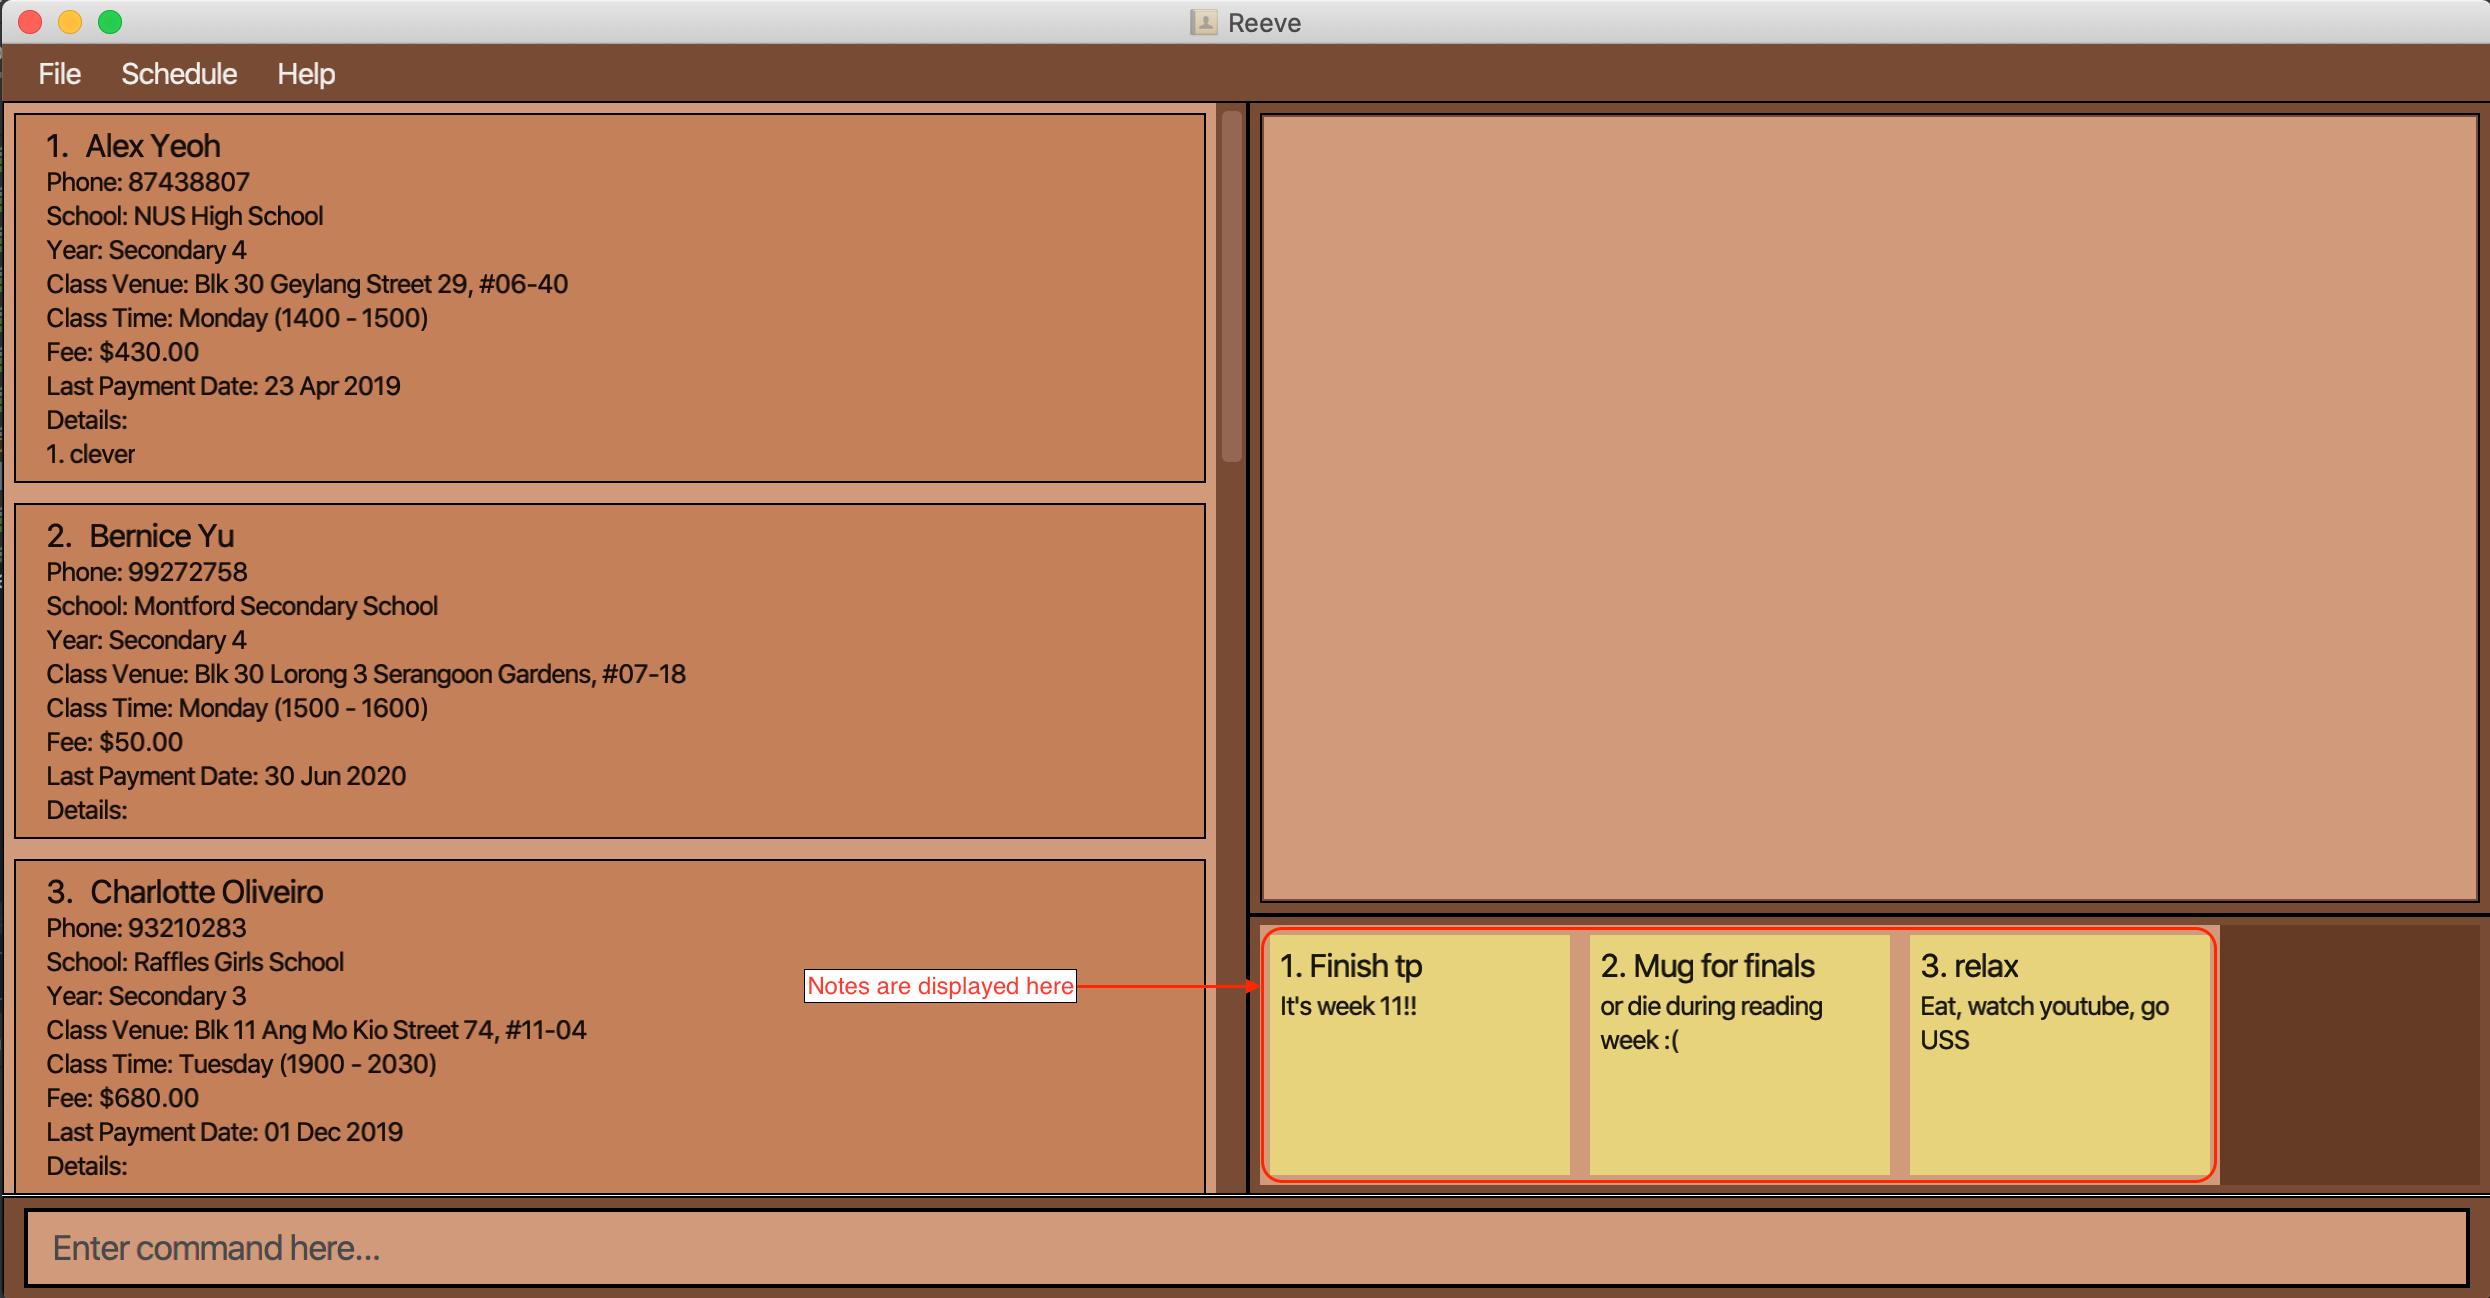
You can store notes containing small amounts of information inside the notebook. This is useful when you want to store information or details that is not related to any student and cannot do so anywhere else in Reeve. You should see the notes on the bottom right hand side of Reeve similar to the display shown below (Figure 24).
3.5.1 Adding a note note add
You can add a note to the notebook for the information you want to store.
Format: note add t/TITLE d/DESCRIPTION
-
TITLEis any string of up to 15 characters. -
DESCRIPTIONis any string of up to 80 characters.
Example:
-
You have just collected a stack of practice papers from your students and want to do something else before marking them but are scared you might forget.
-
You can use
note add t/things to do d/mark practice papersto add a new note with titlethings to doand descriptionmark practice papersso that you can remind yourself later. -
You should see a screen similar to the screen below (Figure 25) when the above command is entered.
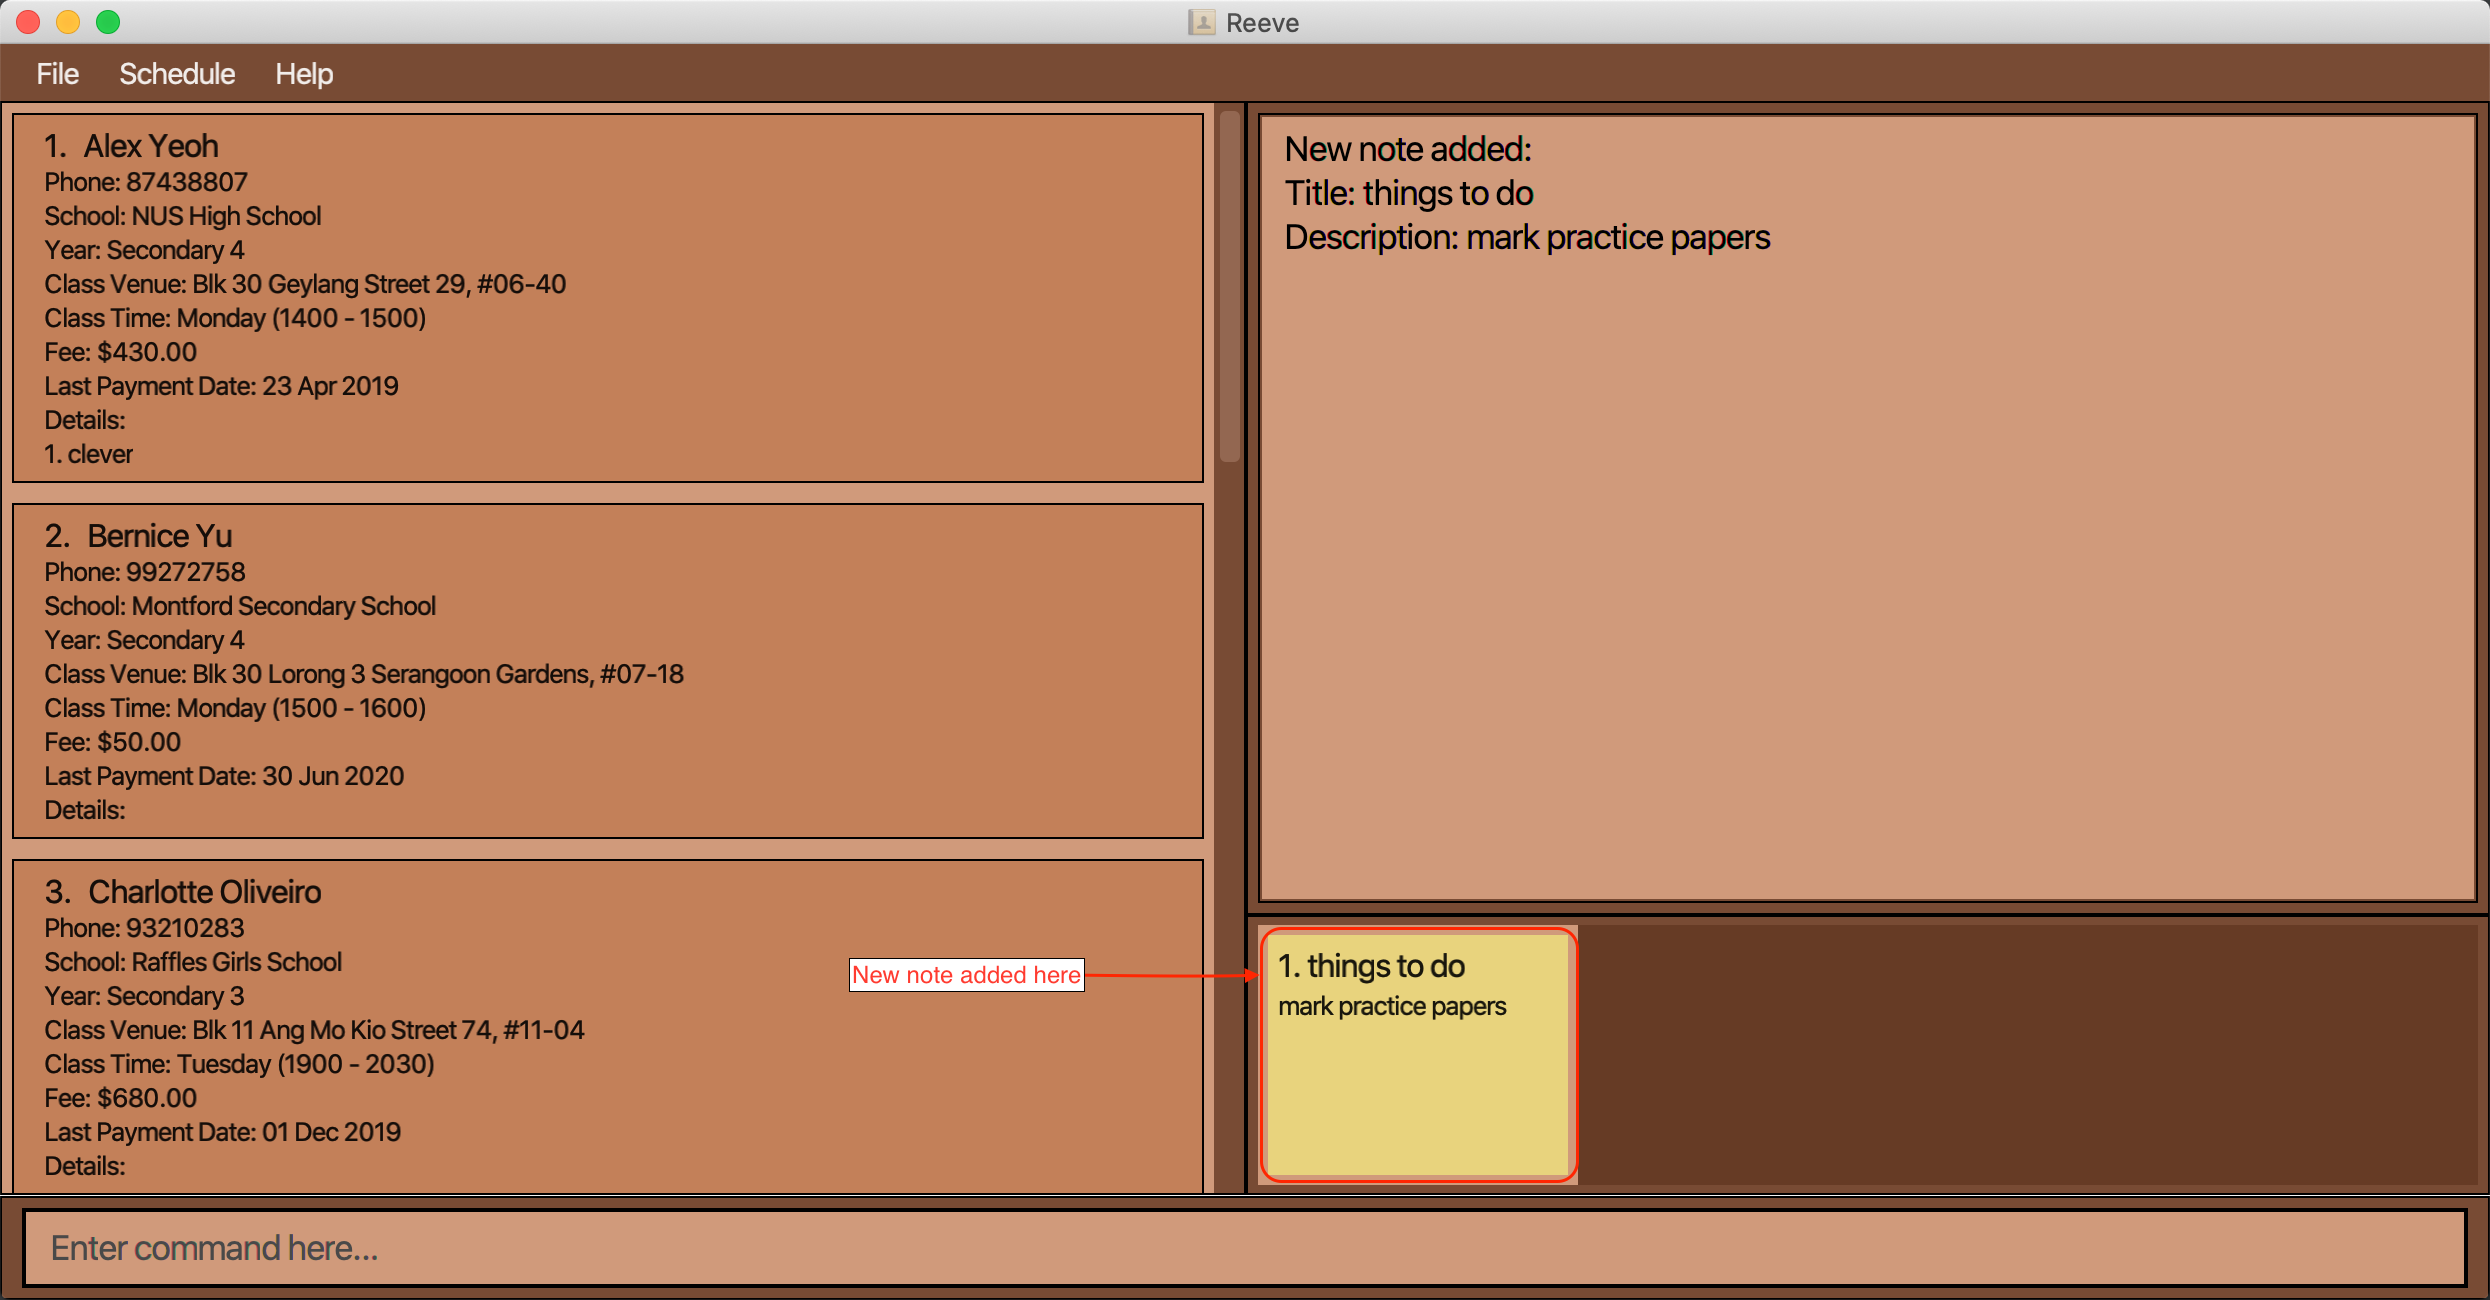 Figure 25: After entering add note command
 -
3.5.2 Editing a note note edit
You can edit a note that is inside the notebook to update the information inside.
Format: note edit NOTE_INDEX [t/TITLE] [d/DESCRIPTION]
- Edits the note at the specified
NOTE_INDEX
Example:
- You left a note to mark practice papers earlier and have just finished marking them. Now, before you take a break,
you want to remind yourself to review the marking before you can give it back to your students.
- Assuming the previous note was the first note, you can use
note edit 1 d/review markingto change the note to remind yourself to review the marking.
- Assuming the previous note was the first note, you can use
3.5.3 Deleting a note note delete
You can delete a note from the notebook when the information is no longer needed.
Format: note delete NOTE_INDEX
- Deletes the note at the specified
NOTE_INDEX
Example:
- Your first note was to remind yourself to grab a cup of coffee. Now that you have bought your cup of coffee, the note is no longer needed.
- You can use
note delete 1to delete the note.
- You can use
4. Command summary
This following table (Table 2) provides a summary of all the commands in Reeve.
Table 2: Summary of commands in Reeve
| Action | Format, Examples |
|---|---|
| Add Student |
add n/NAME p/PHONE s/SCHOOL y/YEAR v/CLASS_VENUE t/CLASS_TIME f/FEE d/LAST_PAYMENT_DATE [a/ADDITIONAL_DETAILS]... e.g. add n/John Doe p/98765432 s/Woodlands Secondary School y/Secondary 2 v/347 Woodlands Ave 3, Singapore 730347 t/1 1200-1400 f/30 d/24/09/2020 a/Likes chocolates a/Needs help with Algebra
|
| Edit Student |
edit STUDENT_INDEX [n/NAME] [p/PHONE] [s/SCHOOL] [y/YEAR] [v/CLASS_VENUE] [t/CLASS_TIME] [f/FEE] [d/LAST_PAYMENT_DATE] e.g. edit 1 n/Arthur p/98727030 s/Meridian Junior College
|
| Find Student |
find [n/NAME] [s/SCHOOL] [y/YEAR]e.g. find n/alex s/yishun
|
| List Students | list |
| Delete Student |
delete STUDENT_INDEXe.g. delete 3
|
| Sort Students |
sort COMPARISON_MEANSe.g. sort year
|
| Overdue | overdue unpaid |
| Add Detail |
detail add STUDENT_INDEX t/DETAIL_TEXTe.g. detail add 1 t/Smart
|
| Edit Detail |
detail edit STUDENT_INDEX i/DETAIL_INDEX t/DETAIL_TEXTe.g. detail edit 1 i/2 t/Handsome
|
| Delete Detail |
detail delete STUDENT_INDEX i/DETAIL_INDEXe.g. detail delete 1 i/3
|
| Clear | clear |
| Add Question |
question add STUDENT_INDEX t/QUESTIONe.g. question add 1 t/How do birds fly?
|
| Resolve Question |
question solve STUDENT_INDEX i/QUESTION_INDEX t/SOLUTIONe.g. question solve 1 i/1 t/Read a book.
|
| Delete Question |
question delete STUDENT_INDEX i/QUESTION_INDEXe.g. question delete 1 i/1
|
| Add Exam |
exam add STUDENT_INDEX n/EXAM_NAME d/EXAM_DATE s/EXAM_SCOREe.g. exam add 1 n/Mid Year 2020 d/08/12/2020 s/40/60
|
| Delete Exam |
exam delete STUDENT_INDEX i/EXAM_INDEXe.g. exam delete 2 i/5
|
| Exam Stats |
exam stats STUDENT_INDEXe.g. exam stats 1
|
| Add Attendance |
attendance add STUDENT_INDEX d/LESSON_DATE a/ATTENDANCE_STATUS [f/FEEDBACK]e.g. attendance add 2 d/08/12/2020 a/present f/attentive
|
| Delete Attendance |
attendance delete STUDENT_INDEX d/ATTENDANCE_DATEe.g. attendance delete 1 d/19/04/2020
|
| Schedule View |
schedule m/VIEW_MODE d/DATE_TO_VIEW e.g. schedule m/weekly d/02/11/2020
|
| Toggle View | toggle |
| Add Note |
note add t/TITLE d/DESCRIPTIONe.g. note add t/things to do d/buy coffee
|
| Edit Note |
note edit NOTE_INDEX [t/title] [d/DESCRIPTION]e.g. note edit 1 d/mark practice papers
|
| Delete Note |
note delete NOTE_INDEXe.g. note delete 1
|
| Help | help |
| Exit | exit |
5. Glossary
The following table (Table 3) provides the definitions of the various terms used in this User Guide.
Table 3: Glossary of terms
| Term | Definition |
|---|---|
| Administrative Details | Details such as class venue, class time, tuition fee, last payment date and other details |
| Academic Details | Details such as questions, exam records and attendance records |
| Detail | Any miscellaneous information regarding a student |
| Exam Record | A record of an exam which includes its name, date and the student’s score |
| Index | Position of an item in a list (1, 2 3 etc) |
6. FAQ
This section provides the answers to Frequently Asked Questions (FAQ) by users.
-
How do I transfer my data to another Computer?
Install the app in the other computer and overwrite the empty data file it creates with the file that contains the data of your previous Reeve home folder. -
Do I have to manually save my data?
Reeve automatically saves data in the hard disk automatically after any command that changes the data. There is no need to save manually. -
How do I view the full details of my student?
Typetoggleand pressEnter, your student’s full details will be displayed. To hide the full details of students, typetoggleand pressEnteragain. -
Where can I find the file that contains my student’s data?
Your student’s data file can be found in the same file as the application. -
How can I set the application window to a fix size whenever I open it?
Reeve automatically save your preferred window size when you close it. Hence, you could adjust the window size to your preferred one before closing Reeve. Reeve will automatically open according to this size. -
I forgot what are the various commands and their format, where can I find the list of commands?
Simply enter thehelpcommand, and you will be directed the list of commands. -
I accidentally deleted all my data, is there a way to recover my past data?
Unfortunately, Reeve currently does not support a backup feature and is unable to recover any deleted data. The backup feature will be coming soon. In the meantime, we advise you to refrain from accidentally clearing all data, you could perhaps create a backupjsonfrom time to time.